

How To Take Passport Photo With Iphone
How to Take a Passport Photo With iPhone
In the current state of the world, most of your travel plans are probably postponed, and you don't need to worry about preparing documents and visa photos. However, you still have to renew your passport if the time has come. Most people prefer going to photo studios. However, their services are rather expensive ($15-20 per photo). What's more, studio photographers have to deal with lots of people during the day, so they can easily make a slip. That's why there is no 100% guarantee your photos won't be rejected later, and you won't have to start all over again.
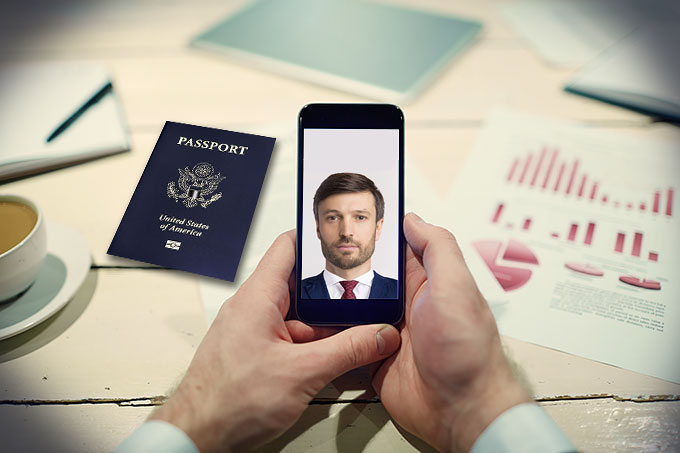
To avoid any problems, take your own passport photo with an iPhone. It's a pretty easy and cheap way to try right at home. And with this guide, it will be even easier! Here you will discover helpful tips on shooting photos with your mobile phone, and learn more about official picture requirements: size, format, background color, etc. As a bonus, we will offer you a convenient iOS app for making and printing digital passport photos on the go.
US Passport Photo Requirements
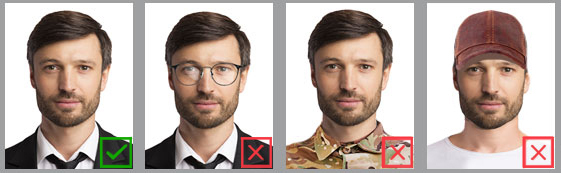
While creating a passport photo on your iPhone, you need to make sure that the final picture complies with the latest official requirements:
- The image size should be 2x2 inches (51x51 mm)
- The head must be between 1 and 1.4 inches (25 and 35 mm)
- The photo should be taken recently (during the last 6 months)
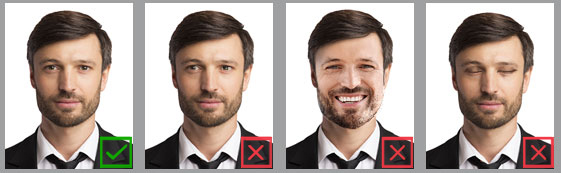
- Look directly in the camera, keep a neutral face expression
- Take a photo in front of a plain background
- Put on clothes you wear on a daily basis
- Do not wear glasses (including tinted glasses) or wireless headsets

These are only the main specifications, so if you want a complete list, get additional information on the official website of the U.S. Department of State.
Rules to Take a Passport Photo With iPhone
To get a perfect result on the first try, you need to make some preparations before tapping the Camera button. One of the most important things to understand: even if you are taking a passport photo with an iPhone, it can't be a selfie. That's why you need to use a tripod with a timer or ask someone for help. Below are additional tips to make the shooting process easier.
Pose and Camera Distance
Stand or sit 1.5 meters away from the person taking your photo, and half a meter from the wall behind you. Don't try striking a pose: keep a straight posture, with your shoulders rolled back. Look directly in the camera, head straight. To avoid having a double-chin, thrust your jaw a bit forward.
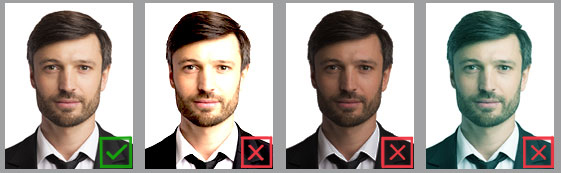
Lighting Adjustment
You need a medium light source that will cast even lighting on your face. The light should not be bright, otherwise there will be strong shadows. You can place a lamp behind the photographer or high above you. Alternatively, you can insert the light source into your camera's hot shoe.
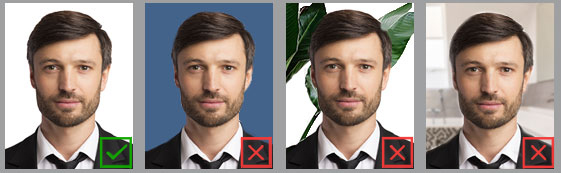
Tips on Background
When it comes to making passport size photos, many people think that a pure white background is the best choice. It's a mistake - sometimes white surroundings can cast stronger lights and even create glares. Pick plain light grey, light blue or creamy walls. Don't stand in front of patterned or complex backgrounds. Also, there should not be any objects in the frame.
Clothes You Can Wear
Put on clothes you wear on a daily basis (not a uniform, though). Avoid pure white color - these clothes will mix up with a light background. The headwear is not allowed since your hairline must be visible. However, there is an exception if you have to put it on for religious reasons. As for glasses and hearing devices, they are normally forbidden, but if you have a prescription, you can wear them.
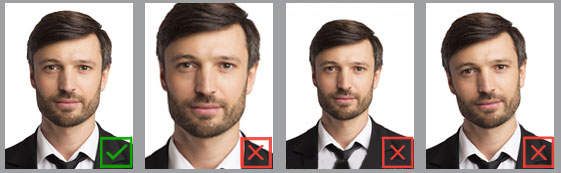
Proper Face Expression
Try keeping a neutral facial expression. Do not frown, open your mouth, show your teeth or smirk. A wide smile is also prohibited, but you can look amiable by keeping your mouth corners slightly up. Avoid tilting or turning your head. The eyes should be wide open and clearly visible.
How to Make a Passport Photo With iPhone
Now that you know how to take a passport photo with your iPhone, it's time to act. Of course, it's possible to edit a photo with a built-in app, however, there is no guarantee the final image will comply with all the official requirements. So there is a high chance it'll be rejected. How to get a perfect image without visiting Walmart or a local photo studio?
Use a handy app - Passport Photo & ID Maker. It is very easy to grasp, and allows you to take and crop photos directly on your iPhone. There are built-in tips and a list of official requirements for each document type. While the app is free to use, it offers one of the largest databases. You can create passport photos for 130+ countries all over the world.
Want to make a passport photo for free?
Get a powerful passport size photo app for your phone!
Try Now
Follow these steps to create a passport photo with your iPhone right now:
Step 1. Select the ID Type
Get started with choosing your country and the document type you need. You can use a convenient search field to find everything in mere seconds. The ID types which require only a soft copy of your photo are marked with the Digital label.
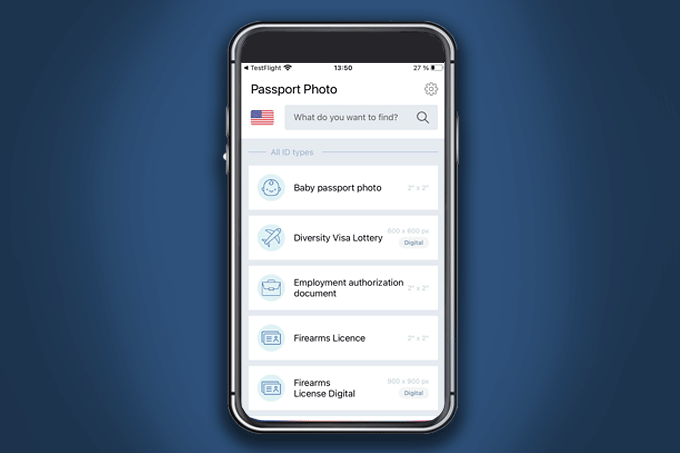 Pick the country and the ID type using the Search field
Step 2. Take a Photo With the App
Passport Photo & ID Maker lets you take a photo directly in the app. There is a convenient camera layout with facial area, crown and jaw lines. All you need to do is to fit your face inside the oval and tap the button. What's more, you can open and read the latest official requirements for this document type while taking the shot.
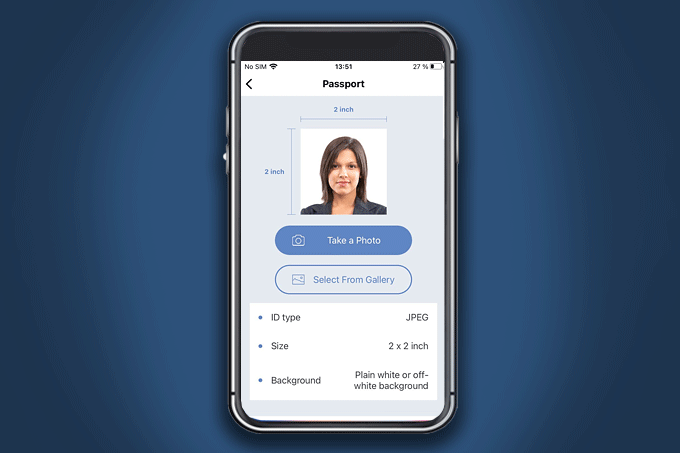 Take a photo with the app or upload your own
Step 3. Crop Your Image in a Tap
After you've taken the shot, you can convert the photo to passport size right on your iPhone. The app can do it automatically, but if you prefer to have control over the process, you can crop the pic manually. Just zoom in or out the image with your fingers to fit the face into a special layout.
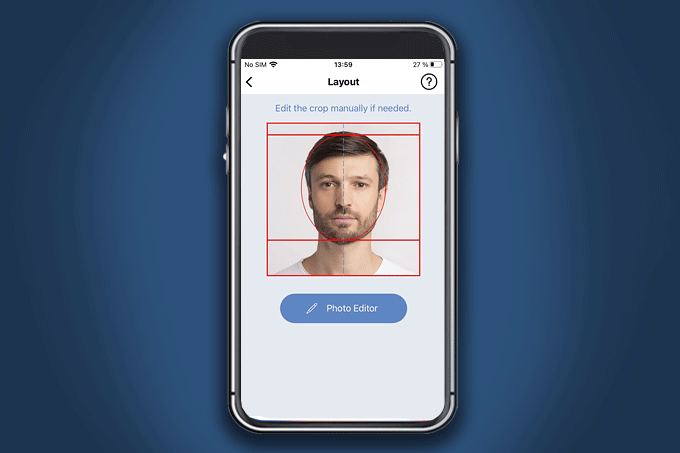 Crop your picture to the required size
Step 4. Replace Clothes in the Photo
Not everyone has a suit or an office gown at hand. With Passport Photo & ID Maker, you can change clothes directly on your image. There are 60+ items for men, women and children, so you will definitely find something that suits your unique style. Pick the clothes you like, then drag them on the photo with your fingers. Once satisfied, move to the next tab.
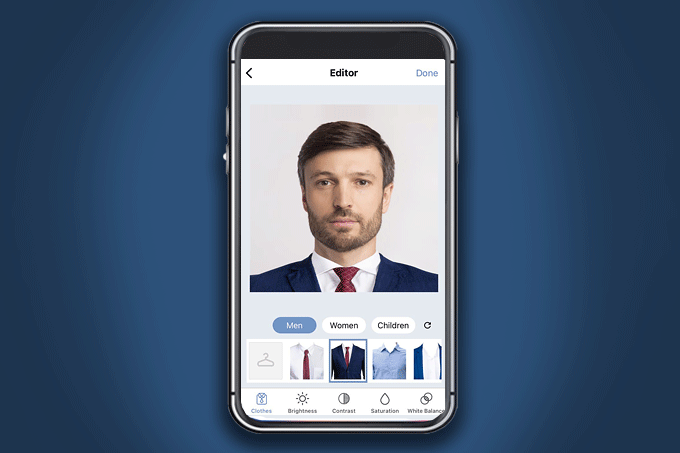 Change your clothes directly on the photo
Step 5. Save or Print Your Image
When you're done, save your photo to the gallery to print the picture from your iPhone at CVS or local store. If you have a printer at home, you can get hard copies of your image right away. Just select the number of pictures, pick one of 10+ built-in paper formats and tap the Print button.
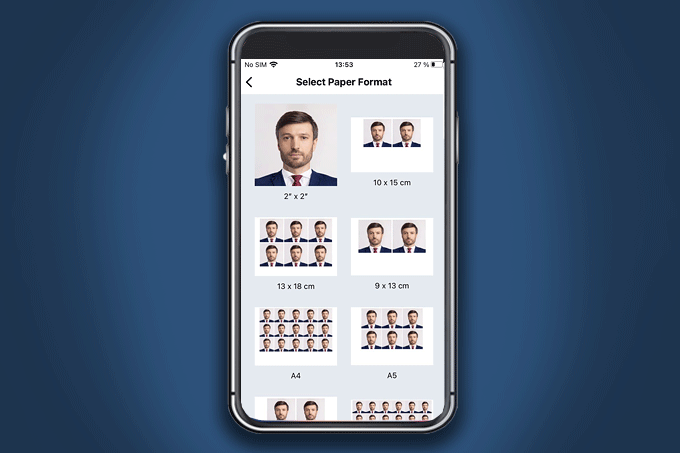 You can print your pictures at home or save a layout for printing later
Need perfect ID photos for visa, driving license, student pass, Green Card lottery or any other type of official documents? Prepare them on your iPhone with easy Passport Photo & ID Maker or use Passport Photo Maker (its counterpart for PC).
Why Should You Use Passport Photo & ID Maker?
Passport Photo & ID Maker is considered to be the best passport photo app for iPhone. Why? First, if you try other apps, most of them are paid, with lots of ads, unfriendly interfaces and few document types. As a result, you will waste lots of time making just one picture. Passport Photo & ID Maker is free to use, offers lots of possibilities and a clear UI.
Second, most apps are one-tricks. So you can't do much except DIY passport photos on your iPhone (with no guarantee they will comply with the requirements). Passport Photo & ID Maker offers you a huge database with templates for passports, visas, ID cards, driving licenses, etc.
Third, you can't print your photos right away with other apps. Some only let you place the order at a local store and you have to pick your images up at Walgreens or Costco. Using Passport Photo & ID Maker, you can print photos directly from your iPhone. You don't need to leave your home: connect the phone to the printer, make a few taps and get your freshly printed hard copies.
Apart from these two advantages, you can enjoy lots of other things like:
- Database for 130+ countries
- Biometric facial features recognition
- Automatic cropping & processing
- Image quality improvement
- Built-in picture editor
- Clothes replacement
- Sharing images via social media
Now it's high time to start preparing your own photos. Get your phone and make perfect shots using our tips and Passport Photo & ID Maker!
How To Take Passport Photo With Iphone
Source: https://ams-photo-software.com/business/how-to-take-a-passport-photo-with-iphone.php
Posted by: hightowerforef1989.blogspot.com
0 Response to "How To Take Passport Photo With Iphone"
Post a Comment